Importando un projecto maven a IntelliJ.
Selecionas el menu File->Open
Vas y buscas el archivo pom del projecto que quieres importar.
Selecciona abrir como proyecto ylisto.
sábado, 21 de octubre de 2017
Usando Jetty con IntelliJ Community para apliaciones web.
1. Configurando Jetty runner. Jetty runner es un plug in muy util para correr nuestras aplicaciones web, en la version enterprise edition este plug in no es necesario ya que esa version nos permite hacer mucho mas cosas que la version community edition como por ejemplo usar tomcat.
Para configurar jetty nos vamos a la opcion para descargar plugins, tecleamos Ctrl-Alt-S.
En la opcion plug in nos vamos a la seccion de busqueda y tecleamos Jetty. Se instala el plug in y listo.
Ahora para correr Jetty necesitamos configurarlo primero, nos vamos a "Edit configurations"
Presionamos en + y agregamos una configuracion para jetty. Sugerimos un path relativo para el projecto, y la ubicacion del webapp folder y del folder classes.

Y listo con esto un servidor de aplicaciones correra en el puerto 8080.
Ahora importante, dadas las restricciones en la comunity edition, no se podra compilar automaticamente un JSP desde IntelliJ. Por desgracia tenemos que indicar a maven que haga la compilacion utilizando el compilador de JSP de tomcat y agregar directivas para que Jetty haga la compilacion cuando se ejecute el jsp. Para eso agregamos las siguientes dependencias al archivo pom y el siguiente plugin:
<!-- https://mvnrepository.com/artifact/tomcat/jasper-compiler -->
<dependency>
<groupId>tomcat</groupId>
<artifactId>jasper-compiler</artifactId>
<version>5.5.23</version>
</dependency>
<!-- https://mvnrepository.com/artifact/tomcat/jasper-compiler-jdt -->
<dependency>
<groupId>tomcat</groupId>
<artifactId>jasper-compiler-jdt</artifactId>
<version>5.5.23</version>
</dependency>
<!-- https://mvnrepository.com/artifact/tomcat/jasper-runtime -->
<dependency>
<groupId>tomcat</groupId>
<artifactId>jasper-runtime</artifactId>
<version>5.5.23</version>
</dependency>
<!-- https://mvnrepository.com/artifact/org.eclipse.jetty/jetty-jspc-maven-plugin -->
<dependency>
<groupId>org.eclipse.jetty</groupId>
<artifactId>jetty-jspc-maven-plugin</artifactId>
<version>9.4.7.v20170914</version>
</dependency>
<plugins>
<!-- begin - precompiling jsps -->
<plugin>
<groupId>org.codehaus.mojo</groupId>
<artifactId>jspc-maven-plugin</artifactId>
<executions>
<execution>
<id>jspc</id>
<goals>
<goal>compile</goal>
</goals>
</execution>
</executions>
</plugin>
</plugins>
lunes, 16 de octubre de 2017
Creando una clase POJO para bd Postgress con Hibernate (Parte 1)
1. Obten los archivos binarios en un zip o tgz del sitio de postgresql.
2. Ve al folder bin de PostgreSQL. Corre la siguiente herramienta para iniciar la base de datos.
$ initdb -U postgres -A password -E utf8 -W -D C:\Users\750802\Documents\pgsql\data
3. Iniciar el servidor de base de datos.
"pg_ctl" -D "C:\Users\750802\Documents\pgsql\data" -l logfile start
4. Para detener la base de datos.
"pg_ctl" -D "C:\Users\750802\Documents\pgsql\data" -l logfile stop
5. Crea un proyecto maven para hibernate y lo importas en eclipse
mvn archetype:generate -DarchetypeArtifactId=maven-archetype-quickstart -DinteractiveMode=false -DgroupId=com.luis.tutorial -DartifactId=01-hibernate-conf
6. Agrega estas dependencias en el archivo pom.xml
<!-- https://mvnrepository.com/artifact/org.hibernate/hibernate-entitymanager -->
<dependency>
<groupId>org.hibernate</groupId>
<artifactId>hibernate-entitymanager</artifactId>
<version>5.2.11.Final</version>
</dependency>
<!-- https://mvnrepository.com/artifact/postgresql/postgresql -->
<dependency>
<groupId>org.postgresql</groupId>
<artifactId>postgresql</artifactId>
<version>9.4.1212</version>
</dependency>
7. Agrega hibernate.cfg.xml
<?xml version='1.0' encoding='UTF-8'?>
<!DOCTYPE hibernate-configuration PUBLIC
"-//Hibernate/Hibernate Configuration DTD 3.0//EN"
"http://www.hibernate.org/dtd/hibernate-configuration-3.0.dtd">
<hibernate-configuration>
<session-factory>
<!-- Connection settings -->
<property name="hibernate.connection.driver_class">org.postgresql.Driver</property>
<property name="hibernate.connection.url">jdbc:postgresql://localhost/luis</property>
<property name="hibernate.connection.username">postgres</property>
<property name="hibernate.connection.password">patito</property>
<!-- SQL dialect -->
<property name="hibernate.dialect">org.hibernate.dialect.PostgreSQLDialect</property>
<!-- Print executed SQL to stdout -->
<property name="show_sql">true</property>
<!-- Drop and re-create all database on startup -->
<property name="hibernate.hbm2ddl.auto">create-drop</property>
<!-- Annotated entity classes -->
<mapping class="com.luis.tutorial.AppUser" />
</session-factory>
</hibernate-configuration>
8. Crea las siguientes clases:
package com.luis.tutorial;
import java.io.Serializable;
import javax.persistence.Entity;
import javax.persistence.GeneratedValue;
import javax.persistence.GenerationType;
import javax.persistence.Id;
@Entity
public class AppUser implements Serializable {
public AppUser() {
};
public AppUser(String login) {
this.login = login;
};
@Id
@GeneratedValue(strategy = GenerationType.IDENTITY)
private Long id;
private String login;
public Long getId() {
return id;
}
public void setId(Long id) {
this.id = id;
}
public String getLogin() {
return login;
}
public void setLogin(String login) {
this.login = login;
}
}
package com.luis.tutorial;
import org.hibernate.Session;
import org.hibernate.SessionFactory;
import org.hibernate.cfg.Configuration;
/**
* Unit test for simple App.
*/
public class AppTest {
public static void main(String[] str) {
SessionFactory sessionFactory = new Configuration().configure().buildSessionFactory();
Session session = sessionFactory.openSession();
session.beginTransaction();
AppUser user = new AppUser("firstuser");
session.save(user);
session.getTransaction().commit();
session.close();
}
}
viernes, 13 de octubre de 2017
Crear webservice con JAX-WS (Document)
Vamos a modificar el webservice RPC anterior y lo cambiaremos a Document.
1. Modificamos la interface HelloWorld a Style.Document
@SOAPBinding(style = Style.DOCUMENT)
public interface HelloWorld {
Las otras clases las dejamos igual.
2. Corremos la clase Publisher,
1. Modificamos la interface HelloWorld a Style.Document
@SOAPBinding(style = Style.DOCUMENT)
public interface HelloWorld {
...
..
2. Corremos la clase Publisher,
Wrapper class com.mkyong.ws.jaxws.GetHelloWorldAsString is not found.
Have you run APT to generate them?
Podemos observar que nos hacen falta unos stubs, los cuales los vamos a generar de la siguiente manera:
wsgen -keep -cp . com.luis.ws.HelloWorldImpl
Generara dos clases extras:
GetHelloWorldAsString, GetHelloWorldAsStringResponse
Corremos la clase publisher una vez mas y corremos el cliente que habiamos generado en el ejemplo RPC.
jueves, 12 de octubre de 2017
Crear webservice con JAX-WS (RPC)
1. Crear la siguiente clase HelloWorld:
package com.luis.ws;
import javax.jws.WebMethod;
import javax.jws.WebService;
import javax.jws.soap.SOAPBinding;
import javax.jws.soap.SOAPBinding.Style;
//Service Endpoint Interface
@WebService
@SOAPBinding(style = Style.RPC)
public interface HelloWorld{
@WebMethod
String getHelloWorldAsString(String name);
}
2. Crear esta otra clase HelloWorldImpl :
package com.luis.ws;
import javax.jws.WebMethod;
import javax.jws.WebService;
//Service Implementation Bean
@WebService(endpointInterface = "com.luis.ws.HelloWorld")
public class HelloWorldImpl implements com.luis.ws.HelloWorld {
public String getHelloWorldAsString(String name) {
return "Hello World JAX-WS " + name;
}
}
3. Crear la clase HelloWorldPublisher :
package com.luis.ws;
import javax.xml.ws.Endpoint;
import com.luis.ws.HelloWorldImpl;
//Endpoint publisher
public class HelloWorldPublisher {
public static void main(String[] args) {
Endpoint.publish("http://localhost:8081/hello", new HelloWorldImpl());
}
}
5. Crear archivo web.xml en WEB-INF.
<web-app id="WebApp_ID" version="2.5"
xmlns="http://java.sun.com/xml/ns/j2ee" xmlns:xsi="http://www.w3.org/2001/XMLSchema-instance"
xsi:schemaLocation="http://java.sun.com/xml/ns/javaee http://java.sun.com/xml/ns/javaee/web-app_2_5.xsd">
<listener>
<listener-class>
com.sun.xml.ws.transport.http.servlet.WSServletContextListener
</listener-class>
</listener>
<servlet>
<servlet-name>hello</servlet-name>
<servlet-class>com.sun.xml.ws.transport.http.servlet.WSServlet
</servlet-class>
<load-on-startup>1</load-on-startup>
</servlet>
<servlet-mapping>
<servlet-name>hello</servlet-name>
<url-pattern>/hello</url-pattern>
</servlet-mapping>
<session-config>
<session-timeout>120</session-timeout>
</session-config>
</web-app>
6. Crear el siguiente archivo pom.xml
<project xmlns="http://maven.apache.org/POM/4.0.0" xmlns:xsi="http://www.w3.org/2001/XMLSchema-instance"
xsi:schemaLocation="http://maven.apache.org/POM/4.0.0 http://maven.apache.org/maven-v4_0_0.xsd">
<modelVersion>4.0.0</modelVersion>
<groupId>1</groupId>
<artifactId>Soap</artifactId>
<packaging>war</packaging>
<version>0.0.1-SNAPSHOT</version>
<name>Soap Maven Webapp</name>
<url>http://maven.apache.org</url>
<dependencies>
<!-- https://mvnrepository.com/artifact/javax.xml.ws/jaxws-api -->
<dependency>
<groupId>javax.xml.ws</groupId>
<artifactId>jaxws-api</artifactId>
<version>2.2.6</version>
</dependency>
<dependency>
<groupId>javax.servlet</groupId>
<artifactId>javax.servlet-api</artifactId>
<version>3.1.0</version>
<scope>provided</scope>
</dependency>
<!-- https://mvnrepository.com/artifact/com.sun.xml.ws/jaxws-rt -->
<dependency>
<groupId>com.sun.xml.ws</groupId>
<artifactId>jaxws-rt</artifactId>
<version>2.1.3</version>
</dependency>
<dependency>
<groupId>junit</groupId>
<artifactId>junit</artifactId>
<version>3.8.1</version>
<scope>test</scope>
</dependency>
</dependencies>
<build>
<finalName>Soap</finalName>
<plugins>
<plugin>
<groupId>org.apache.maven.plugins</groupId>
<artifactId>maven-compiler-plugin</artifactId>
<version>2.5</version>
<configuration>
<source>1.8</source>
<target>1.8</target>
</configuration>
</plugin>
</plugins>
</build>
</project>
6. Hay dos formas para correr el webservice, una es crear el archivo WAR y hacer deployment en tomcat o correr el programa HelloWorldPublisher. Si se corre la clase HelloWorldPublisher se usa la siguiente url
http://localhost:8081/hello?wsdl
7. Para crear los stubs del cliente se utiliza la herramienta wsimport
package com.luis.ws;
import javax.jws.WebMethod;
import javax.jws.WebService;
import javax.jws.soap.SOAPBinding;
import javax.jws.soap.SOAPBinding.Style;
//Service Endpoint Interface
@WebService
@SOAPBinding(style = Style.RPC)
public interface HelloWorld{
@WebMethod
String getHelloWorldAsString(String name);
}
2. Crear esta otra clase HelloWorldImpl :
package com.luis.ws;
import javax.jws.WebMethod;
import javax.jws.WebService;
//Service Implementation Bean
@WebService(endpointInterface = "com.luis.ws.HelloWorld")
public class HelloWorldImpl implements com.luis.ws.HelloWorld {
public String getHelloWorldAsString(String name) {
return "Hello World JAX-WS " + name;
}
}
3. Crear la clase HelloWorldPublisher :
package com.luis.ws;
import javax.xml.ws.Endpoint;
import com.luis.ws.HelloWorldImpl;
//Endpoint publisher
public class HelloWorldPublisher {
public static void main(String[] args) {
Endpoint.publish("http://localhost:8081/hello", new HelloWorldImpl());
}
}
4. Crear el sigueinte archivo sun-jaxws.xml en WEB-INF
<?xml version="1.0" encoding="UTF-8"?>
<endpoints
xmlns="http://java.sun.com/xml/ns/jax-ws/ri/runtime"
version="2.0">
<endpoint
name="HelloWorld"
implementation="com.luis.ws.HelloWorldImpl"
url-pattern="/hello"/>
</endpoints>
5. Crear archivo web.xml en WEB-INF.
<web-app id="WebApp_ID" version="2.5"
xmlns="http://java.sun.com/xml/ns/j2ee" xmlns:xsi="http://www.w3.org/2001/XMLSchema-instance"
xsi:schemaLocation="http://java.sun.com/xml/ns/javaee http://java.sun.com/xml/ns/javaee/web-app_2_5.xsd">
<listener>
<listener-class>
com.sun.xml.ws.transport.http.servlet.WSServletContextListener
</listener-class>
</listener>
<servlet>
<servlet-name>hello</servlet-name>
<servlet-class>com.sun.xml.ws.transport.http.servlet.WSServlet
</servlet-class>
<load-on-startup>1</load-on-startup>
</servlet>
<servlet-mapping>
<servlet-name>hello</servlet-name>
<url-pattern>/hello</url-pattern>
</servlet-mapping>
<session-config>
<session-timeout>120</session-timeout>
</session-config>
</web-app>
6. Crear el siguiente archivo pom.xml
<project xmlns="http://maven.apache.org/POM/4.0.0" xmlns:xsi="http://www.w3.org/2001/XMLSchema-instance"
xsi:schemaLocation="http://maven.apache.org/POM/4.0.0 http://maven.apache.org/maven-v4_0_0.xsd">
<modelVersion>4.0.0</modelVersion>
<groupId>1</groupId>
<artifactId>Soap</artifactId>
<packaging>war</packaging>
<version>0.0.1-SNAPSHOT</version>
<name>Soap Maven Webapp</name>
<url>http://maven.apache.org</url>
<dependencies>
<!-- https://mvnrepository.com/artifact/javax.xml.ws/jaxws-api -->
<dependency>
<groupId>javax.xml.ws</groupId>
<artifactId>jaxws-api</artifactId>
<version>2.2.6</version>
</dependency>
<dependency>
<groupId>javax.servlet</groupId>
<artifactId>javax.servlet-api</artifactId>
<version>3.1.0</version>
<scope>provided</scope>
</dependency>
<!-- https://mvnrepository.com/artifact/com.sun.xml.ws/jaxws-rt -->
<dependency>
<groupId>com.sun.xml.ws</groupId>
<artifactId>jaxws-rt</artifactId>
<version>2.1.3</version>
</dependency>
<dependency>
<groupId>junit</groupId>
<artifactId>junit</artifactId>
<version>3.8.1</version>
<scope>test</scope>
</dependency>
</dependencies>
<build>
<finalName>Soap</finalName>
<plugins>
<plugin>
<groupId>org.apache.maven.plugins</groupId>
<artifactId>maven-compiler-plugin</artifactId>
<version>2.5</version>
<configuration>
<source>1.8</source>
<target>1.8</target>
</configuration>
</plugin>
</plugins>
</build>
</project>
6. Hay dos formas para correr el webservice, una es crear el archivo WAR y hacer deployment en tomcat o correr el programa HelloWorldPublisher. Si se corre la clase HelloWorldPublisher se usa la siguiente url
http://localhost:8081/hello?wsdl
7. Para crear los stubs del cliente se utiliza la herramienta wsimport
wsimport -keep http://localhost:9999/ws/hello?wsdl
7. Se generaran los siguientes stubs: HelloWorldImplService
package com.luis.ws;
import java.net.MalformedURLException;
import java.net.URL;
import javax.xml.namespace.QName;
import javax.xml.ws.Service;
import javax.xml.ws.WebEndpoint;
import javax.xml.ws.WebServiceClient;
import javax.xml.ws.WebServiceException;
import javax.xml.ws.WebServiceFeature;
/**
* This class was generated by the JAX-WS RI.
* JAX-WS RI 2.2.9-b130926.1035
* Generated source version: 2.2
*
*/
@WebServiceClient(name = "HelloWorldImplService", targetNamespace = "http://ws.luis.com/", wsdlLocation = "http://localhost:8081/hello?wsdl")
public class HelloWorldImplService
extends Service
{
private final static URL HELLOWORLDIMPLSERVICE_WSDL_LOCATION;
private final static WebServiceException HELLOWORLDIMPLSERVICE_EXCEPTION;
private final static QName HELLOWORLDIMPLSERVICE_QNAME = new QName("http://ws.luis.com/", "HelloWorldImplService");
static {
URL url = null;
WebServiceException e = null;
try {
url = new URL("http://localhost:8081/hello?wsdl");
} catch (MalformedURLException ex) {
e = new WebServiceException(ex);
}
HELLOWORLDIMPLSERVICE_WSDL_LOCATION = url;
HELLOWORLDIMPLSERVICE_EXCEPTION = e;
}
public HelloWorldImplService() {
super(__getWsdlLocation(), HELLOWORLDIMPLSERVICE_QNAME);
}
public HelloWorldImplService(WebServiceFeature... features) {
super(__getWsdlLocation(), HELLOWORLDIMPLSERVICE_QNAME, features);
}
public HelloWorldImplService(URL wsdlLocation) {
super(wsdlLocation, HELLOWORLDIMPLSERVICE_QNAME);
}
public HelloWorldImplService(URL wsdlLocation, WebServiceFeature... features) {
super(wsdlLocation, HELLOWORLDIMPLSERVICE_QNAME, features);
}
public HelloWorldImplService(URL wsdlLocation, QName serviceName) {
super(wsdlLocation, serviceName);
}
public HelloWorldImplService(URL wsdlLocation, QName serviceName, WebServiceFeature... features) {
super(wsdlLocation, serviceName, features);
}
/**
*
* @return
* returns HelloWorld
*/
@WebEndpoint(name = "HelloWorldImplPort")
public HelloWorld getHelloWorldImplPort() {
return super.getPort(new QName("http://ws.luis.com/", "HelloWorldImplPort"), HelloWorld.class);
}
/**
*
* @param features
* A list of {@link javax.xml.ws.WebServiceFeature} to configure on the proxy. Supported features not in the <code>features</code> parameter will have their default values.
* @return
* returns HelloWorld
*/
@WebEndpoint(name = "HelloWorldImplPort")
public HelloWorld getHelloWorldImplPort(WebServiceFeature... features) {
return super.getPort(new QName("http://ws.luis.com/", "HelloWorldImplPort"), HelloWorld.class, features);
}
private static URL __getWsdlLocation() {
if (HELLOWORLDIMPLSERVICE_EXCEPTION!= null) {
throw HELLOWORLDIMPLSERVICE_EXCEPTION;
}
return HELLOWORLDIMPLSERVICE_WSDL_LOCATION;
}
}
Se generaran los siguientes stubs: HelloWorldInterface
package com.luis.ws;
import javax.jws.WebMethod;
import javax.jws.WebParam;
import javax.jws.WebResult;
import javax.jws.WebService;
import javax.jws.soap.SOAPBinding;
/**
* This class was generated by the JAX-WS RI.
* JAX-WS RI 2.2.9-b130926.1035
* Generated source version: 2.2
*
*/
@WebService(name = "HelloWorld", targetNamespace = "http://ws.luis.com/")
@SOAPBinding(style = SOAPBinding.Style.RPC)
public interface HelloWorldInterface {
/**
*
* @param arg0
* @return
* returns java.lang.String
*/
@WebMethod
@WebResult(partName = "return")
public String getHelloWorldAsString(
@WebParam(name = "arg0", partName = "arg0")
String arg0);
}
Nosotros crearemos nuestro propio cliente en base a estos stubs:
package com.luis.ws;
import java.net.URL;
import javax.xml.namespace.QName;
import javax.xml.ws.Service;
import com.luis.ws.HelloWorld;
public class HelloWorldClient {
public static void main(String[] args) throws Exception {
URL url = new URL("http://localhost:8081/hello?wsdl");
// 1st argument service URI, refer to wsdl document above
// 2nd argument is service name, refer to wsdl document above
QName qname = new QName("http://ws.luis.com/", "HelloWorldImplService");
Service service = Service.create(url, qname);
HelloWorld hello = service.getPort(HelloWorld.class);
System.out.println(hello.getHelloWorldAsString("mario"));
}
}
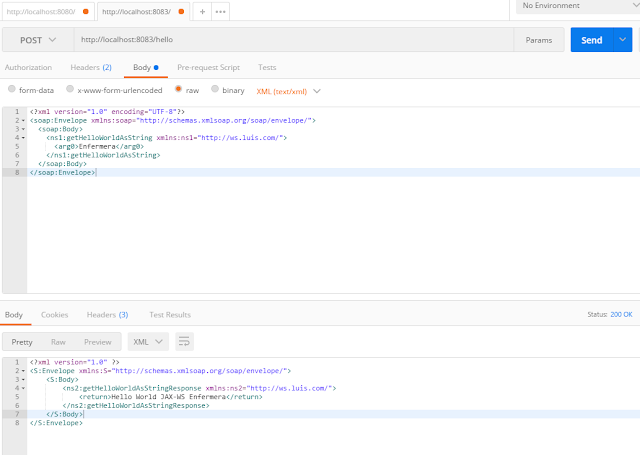
Otra forma de probar el web service es haciendo un POST con el request XML para SOAP.
<?xml version="1.0" encoding="UTF-8"?>
<soap:Envelope xmlns:soap="http://schemas.xmlsoap.org/soap/envelope/">
<soap:Body>
<ns1:getHelloWorldAsString xmlns:ns1="http://ws.luis.com/">
<arg0>Enfermera</arg0>
</ns1:getHelloWorldAsString>
</soap:Body>
</soap:Envelope>
Devolvera algo asi:
<?xml version="1.0" ?>
<S:Envelope xmlns:S="http://schemas.xmlsoap.org/soap/envelope/">
<S:Body>
<ns2:getHelloWorldAsStringResponse xmlns:ns2="http://ws.luis.com/">
<return>Hello World JAX-WS Enfermera</return>
</ns2:getHelloWorldAsStringResponse>
</S:Body>
</S:Envelope>

martes, 10 de octubre de 2017
Crear un webservice RESTFUL en Spring (XML)
Vamos a extender el ejemplo de webservice Restful con JSON para aceptar peticiones con XML.
1. Modificamos la clase employee y agregamos el anotation XMLRootelement y XmlAccesorType(XmlAccessType.NONE). Tambien agregamos el anotation @XmlElement para cada uno de los campos de la clase.
package com.model;
import java.io.Serializable;
import java.util.Date;
import javax.xml.bind.annotation.XmlAccessorType;
import javax.xml.bind.annotation.XmlElement;
import javax.xml.bind.annotation.XmlRootElement;
import com.fasterxml.jackson.databind.annotation.JsonSerialize;
import com.fasterxml.jackson.databind.ser.std.DateSerializer;
import javax.xml.bind.annotation.XmlAccessType;
@XmlRootElement(name = "employee")
@XmlAccessorType(XmlAccessType.NONE)
public class Employee implements Serializable {
private static final long serialVersionUID = -7788619177798333712L;
@XmlElement
private int id;
@XmlElement
private String name;
@XmlElement
private Date createdDate;
public Employee(Integer id, String firstName, Date d) {
super();
this.id = id;
this.name = firstName;
this.createdDate = d;
}
public Employee() {
super();
}
public int getId() {
return id;
}
public void setId(int id) {
this.id = id;
}
public String getName() {
return name;
}
public void setName(String name) {
this.name = name;
}
@JsonSerialize(using = DateSerializer.class)
public Date getCreatedDate() {
return createdDate;
}
public void setCreatedDate(Date createdDate) {
this.createdDate = createdDate;
}
}
2. Para agrupar varios objetos empleados, creamos una clase de servicios de la siguiente manera, se agrega el XmlRootElement y el Xmlelement de la clase employee.
package com.services;
import java.io.Serializable;
import java.util.ArrayList;
import java.util.List;
import javax.xml.bind.annotation.XmlElement;
import javax.xml.bind.annotation.XmlRootElement;
import com.model.Employee;
@XmlRootElement(name = "employees")
public class EmployeeService implements Serializable {
private List<Employee> employees = new ArrayList<Employee>();
private static final long serialVersionUID = 1L;
@XmlElement(name = "employee")
public List<Employee> getEmployees() {
return employees;
}
public void setEmployees(List<Employee> employeeList) {
this.employees = employeeList;
}
}
3. Agregamos las dependencia para las librerias de XML en el archivo pom.xml
<dependency>
<groupId>javax.xml.bind</groupId>
<artifactId>jaxb-api</artifactId>
<version>2.1</version>
</dependency>
<!-- https://mvnrepository.com/artifact/com.fasterxml.jackson.core/jackson-core -->
<dependency>
<groupId>com.fasterxml.jackson.core</groupId>
<artifactId>jackson-core</artifactId>
<version>2.9.1</version>
</dependency>
<!-- https://mvnrepository.com/artifact/com.fasterxml.jackson.core/jackson-databind -->
<dependency>
<groupId>com.fasterxml.jackson.core</groupId>
<artifactId>jackson-databind</artifactId>
<version>2.9.1</version>
</dependency>
4. Modificamos la clase getAllEmployees en EmployeeController del ejemplo de Json, y lo ajustamos de la sigueinte manera:
@RequestMapping(value = EmpRestURIConstants.GET_ALL_EMP, method = RequestMethod.GET)
public @ResponseBody EmployeeService getAllEmployees() {
logger.info("Start getAllEmployees.");
EmployeeService objServices = new EmployeeService();
List<Employee> emps = new ArrayList<Employee>();
Set<Integer> empIdKeys = empData.keySet();
for (Integer i : empIdKeys) {
emps.add(empData.get(i));
}
objServices.setEmployees(emps);
return objServices;
}
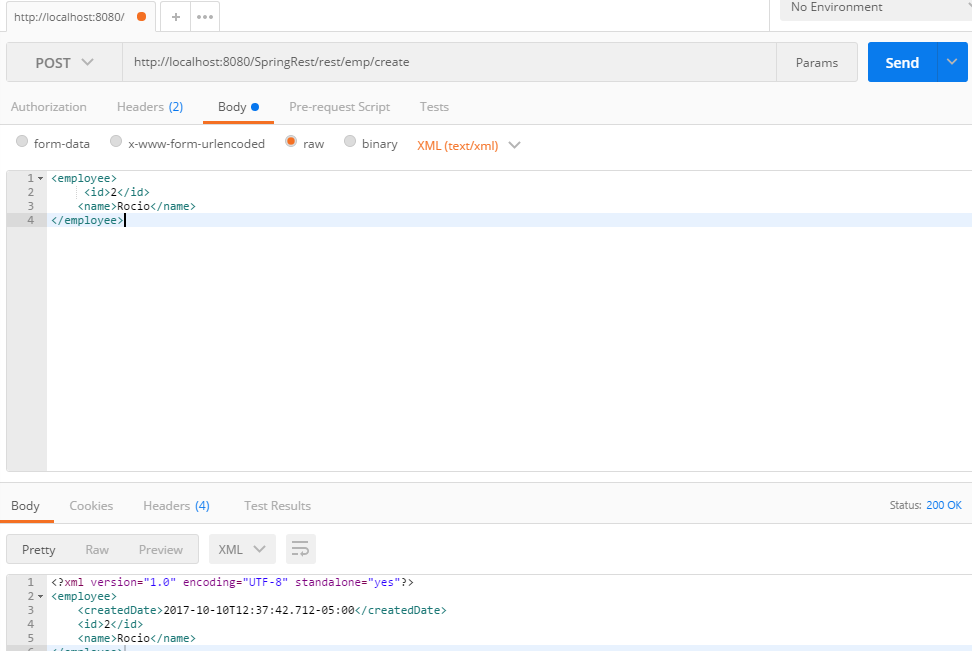
4. Vamos a probar el servicio web usando xml y json combinadamente, para empezar vamos a crear un nuevo registro de empleado metodo POST con el siguiente body:
<employee> <id>2</id> <name>Rocio</name> </employee>
Agregar los headers:
Accept: text/xml
Content-type: text/xml
Ahora extraemos el empleado recien creado de la siguiente manera:
http://localhost:8080/SpringRest/rest/emp/2
Agregar el header:
Accept: text/xml
Obtendremos el siguiente resultado:
<?xml version="1.0" encoding="UTF-8" standalone="yes"?>
<employee>
<createdDate>2017-10-10T12:37:42.712-05:00</createdDate>
<id>2</id>
<name>Rocio</name>
</employee>
Agregar el header:
Accept: application/json
Obtendremos el siguiente resultado:
{
"id": 2,
"name": "Rocio",
"createdDate": 1507657062712
}
Ahora creamos otro usuario, pero combinaremos el request con xml y el resultado con json.
http://localhost:8080/SpringRest/rest/emp/create
Accept: application/json
Content-type: text/xml

http://localhost:8080/SpringRest/rest/emp/create
Accept: application/xml
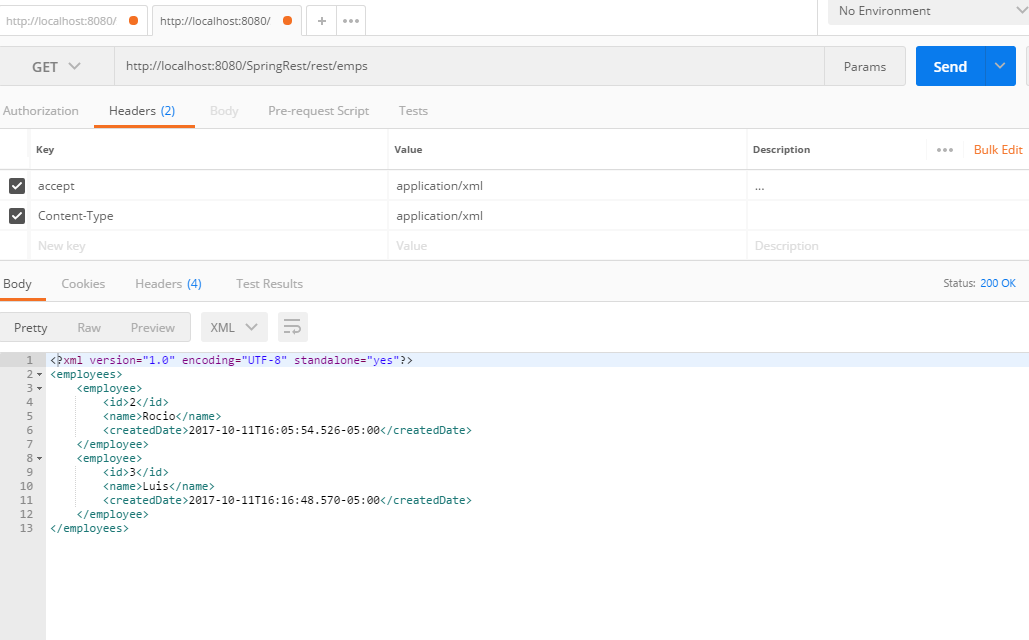
Para extraer todos los empleados.
http://localhost:8080/SpringRest/rest/emps

1. Modificamos la clase employee y agregamos el anotation XMLRootelement y XmlAccesorType(XmlAccessType.NONE). Tambien agregamos el anotation @XmlElement para cada uno de los campos de la clase.
package com.model;
import java.io.Serializable;
import java.util.Date;
import javax.xml.bind.annotation.XmlAccessorType;
import javax.xml.bind.annotation.XmlElement;
import javax.xml.bind.annotation.XmlRootElement;
import com.fasterxml.jackson.databind.annotation.JsonSerialize;
import com.fasterxml.jackson.databind.ser.std.DateSerializer;
import javax.xml.bind.annotation.XmlAccessType;
@XmlRootElement(name = "employee")
@XmlAccessorType(XmlAccessType.NONE)
public class Employee implements Serializable {
private static final long serialVersionUID = -7788619177798333712L;
@XmlElement
private int id;
@XmlElement
private String name;
@XmlElement
private Date createdDate;
public Employee(Integer id, String firstName, Date d) {
super();
this.id = id;
this.name = firstName;
this.createdDate = d;
}
public Employee() {
super();
}
public int getId() {
return id;
}
public void setId(int id) {
this.id = id;
}
public String getName() {
return name;
}
public void setName(String name) {
this.name = name;
}
@JsonSerialize(using = DateSerializer.class)
public Date getCreatedDate() {
return createdDate;
}
public void setCreatedDate(Date createdDate) {
this.createdDate = createdDate;
}
}
2. Para agrupar varios objetos empleados, creamos una clase de servicios de la siguiente manera, se agrega el XmlRootElement y el Xmlelement de la clase employee.
package com.services;
import java.io.Serializable;
import java.util.ArrayList;
import java.util.List;
import javax.xml.bind.annotation.XmlElement;
import javax.xml.bind.annotation.XmlRootElement;
import com.model.Employee;
@XmlRootElement(name = "employees")
public class EmployeeService implements Serializable {
private List<Employee> employees = new ArrayList<Employee>();
private static final long serialVersionUID = 1L;
@XmlElement(name = "employee")
public List<Employee> getEmployees() {
return employees;
}
public void setEmployees(List<Employee> employeeList) {
this.employees = employeeList;
}
}
3. Agregamos las dependencia para las librerias de XML en el archivo pom.xml
<dependency>
<groupId>javax.xml.bind</groupId>
<artifactId>jaxb-api</artifactId>
<version>2.1</version>
</dependency>
<dependency>
<groupId>com.fasterxml.jackson.core</groupId>
<artifactId>jackson-core</artifactId>
<version>2.9.1</version>
</dependency>
<!-- https://mvnrepository.com/artifact/com.fasterxml.jackson.core/jackson-databind -->
<dependency>
<groupId>com.fasterxml.jackson.core</groupId>
<artifactId>jackson-databind</artifactId>
<version>2.9.1</version>
</dependency>
4. Modificamos la clase getAllEmployees en EmployeeController del ejemplo de Json, y lo ajustamos de la sigueinte manera:
@RequestMapping(value = EmpRestURIConstants.GET_ALL_EMP, method = RequestMethod.GET)
public @ResponseBody EmployeeService getAllEmployees() {
logger.info("Start getAllEmployees.");
EmployeeService objServices = new EmployeeService();
List<Employee> emps = new ArrayList<Employee>();
Set<Integer> empIdKeys = empData.keySet();
for (Integer i : empIdKeys) {
emps.add(empData.get(i));
}
objServices.setEmployees(emps);
return objServices;
}
4. Vamos a probar el servicio web usando xml y json combinadamente, para empezar vamos a crear un nuevo registro de empleado metodo POST con el siguiente body:
<employee> <id>2</id> <name>Rocio</name> </employee>
Agregar los headers:
Accept: text/xml
Content-type: text/xml
http://localhost:8080/SpringRest/rest/emp/create

Ahora extraemos el empleado recien creado de la siguiente manera:
http://localhost:8080/SpringRest/rest/emp/2
Agregar el header:
Accept: text/xml
Obtendremos el siguiente resultado:
<?xml version="1.0" encoding="UTF-8" standalone="yes"?>
<employee>
<createdDate>2017-10-10T12:37:42.712-05:00</createdDate>
<id>2</id>
<name>Rocio</name>
</employee>
Agregar el header:
Accept: application/json
Obtendremos el siguiente resultado:
{
"id": 2,
"name": "Rocio",
"createdDate": 1507657062712
}
http://localhost:8080/SpringRest/rest/emp/create
Accept: application/json
Content-type: text/xml

http://localhost:8080/SpringRest/rest/emp/create
Accept: application/xml
Para extraer todos los empleados.
http://localhost:8080/SpringRest/rest/emps
Crear un webservice RESTFUL en Spring (JSON)
Vamos a crear un webservice Restful con JSON en Spring.


Para crear un registro para un empleado nuevo, se utiliza el siguiente webservice con el metodo POST con el siguiente body: {"id": 1,"name": "Luis Mi"}

1 Crear un modulo maven para web.
2. Agregar lo siguiente en web.xml. En el archivo web.xml se define el servlet DispatcherServlet.
<web-app id="WebApp_ID" version="2.4"
xmlns="http://java.sun.com/xml/ns/j2ee" xmlns:xsi="http://www.w3.org/2001/XMLSchema-instance"
xsi:schemaLocation="http://java.sun.com/xml/ns/javaee http://java.sun.com/xml/ns/javaee/web-app_2_5.xsd">
<display-name>Spring MVC Application</display-name>
<servlet>
<servlet-name>SpringRest</servlet-name>
<servlet-class>org.springframework.web.servlet.DispatcherServlet</servlet-class>
<load-on-startup>1</load-on-startup>
</servlet>
<servlet-mapping>
<servlet-name>SpringRest</servlet-name>
<url-pattern>/</url-pattern>
</servlet-mapping>
</web-app>
3. Crear el archivo SpringRest-servlet.xml para la configuracion de spring mvc. En el archivo SpringRest-servlet.xml se definen varias cosas entre ellas se carga el bean del servicio web, y se definen los beans para convertir de pojo a json y de json a pojo.
<?xml version="1.0" encoding="UTF-8"?>
<beans:beans xmlns="http://www.springframework.org/schema/mvc"
xmlns:xsi="http://www.w3.org/2001/XMLSchema-instance" xmlns:beans="http://www.springframework.org/schema/beans"
xmlns:context="http://www.springframework.org/schema/context"
xsi:schemaLocation="http://www.springframework.org/schema/mvc http://www.springframework.org/schema/mvc/spring-mvc.xsd
http://www.springframework.org/schema/beans http://www.springframework.org/schema/beans/spring-beans.xsd
http://www.springframework.org/schema/context http://www.springframework.org/schema/context/spring-context.xsd">
<!-- DispatcherServlet Context: defines this servlet's request-processing
infrastructure -->
<!-- Enables the Spring MVC @Controller programming model -->
<annotation-driven />
<!-- Resolves views selected for rendering by @Controllers to .jsp resources
in the /WEB-INF/views directory -->
<beans:bean
class="org.springframework.web.servlet.view.InternalResourceViewResolver">
<beans:property name="prefix" value="/" />
<beans:property name="suffix" value=".jsp" />
</beans:bean>
<resources mapping="/**" location="/" />
<context:component-scan base-package="com.webservices" />
</beans:beans>
4. Crear el modelo employee
package com.model;
import java.io.Serializable;
import java.util.Date;
import com.fasterxml.jackson.databind.annotation.JsonSerialize;
import com.fasterxml.jackson.databind.ser.std.DateSerializer;
public class Employee implements Serializable {
private static final long serialVersionUID = -7788619177798333712L;
private int id;
private String name;
private Date createdDate;
public int getId() {
return id;
}
public void setId(int id) {
this.id = id;
}
public String getName() {
return name;
}
public void setName(String name) {
this.name = name;
}
@JsonSerialize(using = DateSerializer.class)
public Date getCreatedDate() {
return createdDate;
}
public void setCreatedDate(Date createdDate) {
this.createdDate = createdDate;
}
}
5. Crear una clase estatica para las URIs
package com.model;
public class EmpRestURIConstants {
public static final String DUMMY_EMP = "/rest/emp/dummy";
public static final String GET_EMP = "/rest/emp/{id}";
public static final String GET_ALL_EMP = "/rest/emps";
public static final String CREATE_EMP = "/rest/emp/create";
public static final String DELETE_EMP = "/rest/emp/delete/{id}";
}
6. Crear el controlador principal.
package com.webservices;
import java.util.ArrayList;
import java.util.Date;
import java.util.HashMap;
import java.util.List;
import java.util.Map;
import java.util.Set;
import org.slf4j.Logger;
import org.slf4j.LoggerFactory;
import org.springframework.stereotype.Controller;
import org.springframework.web.bind.annotation.PathVariable;
import org.springframework.web.bind.annotation.RequestBody;
import org.springframework.web.bind.annotation.RequestMapping;
import org.springframework.web.bind.annotation.RequestMethod;
import org.springframework.web.bind.annotation.ResponseBody;
import com.model.Employee;
import com.model.EmpRestURIConstants;
/**
* Handles requests for the Employee service.
*/
@Controller
public class EmployeeController {
private static final Logger logger = LoggerFactory.getLogger(EmployeeController.class);
//Map to store employees, ideally we should use database
Map<Integer, Employee> empData = new HashMap<Integer, Employee>();
@RequestMapping(value = EmpRestURIConstants.DUMMY_EMP, method = RequestMethod.GET)
public @ResponseBody Employee getDummyEmployee() {
logger.info("Start getDummyEmployee");
Employee emp = new Employee();
emp.setId(9999);
emp.setName("Dummy");
emp.setCreatedDate(new Date());
empData.put(9999, emp);
return emp;
}
@RequestMapping(value = EmpRestURIConstants.GET_EMP, method = RequestMethod.GET)
public @ResponseBody Employee getEmployee(@PathVariable("id") int empId) {
logger.info("Start getEmployee. ID="+empId);
return empData.get(empId);
}
@RequestMapping(value = EmpRestURIConstants.GET_ALL_EMP, method = RequestMethod.GET)
public @ResponseBody List<Employee> getAllEmployees() {
logger.info("Start getAllEmployees.");
List<Employee> emps = new ArrayList<Employee>();
Set<Integer> empIdKeys = empData.keySet();
for(Integer i : empIdKeys){
emps.add(empData.get(i));
}
return emps;
}
@RequestMapping(value = EmpRestURIConstants.CREATE_EMP, method = RequestMethod.POST)
public @ResponseBody Employee createEmployee(@RequestBody Employee emp) {
logger.info("Start createEmployee.");
emp.setCreatedDate(new Date());
empData.put(emp.getId(), emp);
return emp;
}
@RequestMapping(value = EmpRestURIConstants.DELETE_EMP, method = RequestMethod.PUT)
public @ResponseBody Employee deleteEmployee(@PathVariable("id") int empId) {
logger.info("Start deleteEmployee.");
Employee emp = empData.get(empId);
empData.remove(empId);
return emp;
}
}
@ResponseBody traduce el bean a un formato especificado en la configuracion. En este caso se convierte automaticamente a una version de Json del bean. @RequestMapping es usado para mapear la url al metodo. @PathVariable es usado para mapear el path de variable.
@ResponseBody traduce el bean a un formato especificado en la configuracion. En este caso se convierte automaticamente a una version de Json del bean. @RequestMapping es usado para mapear la url al metodo. @PathVariable es usado para mapear el path de variable.
7. Usaremos postman para probar los servicios web:
Empezamos probando el health del servicio web.
http://localhost:8080/SpringRest/rest/emp/dummy

Para extraer un empleado en particular:
http://localhost:8080/SpringRest/rest/emp/9999/

Para crear un registro para un empleado nuevo, se utiliza el siguiente webservice con el metodo POST con el siguiente body: {"id": 1,"name": "Luis Mi"}
http://localhost:8080/SpringRest/rest/emp/create

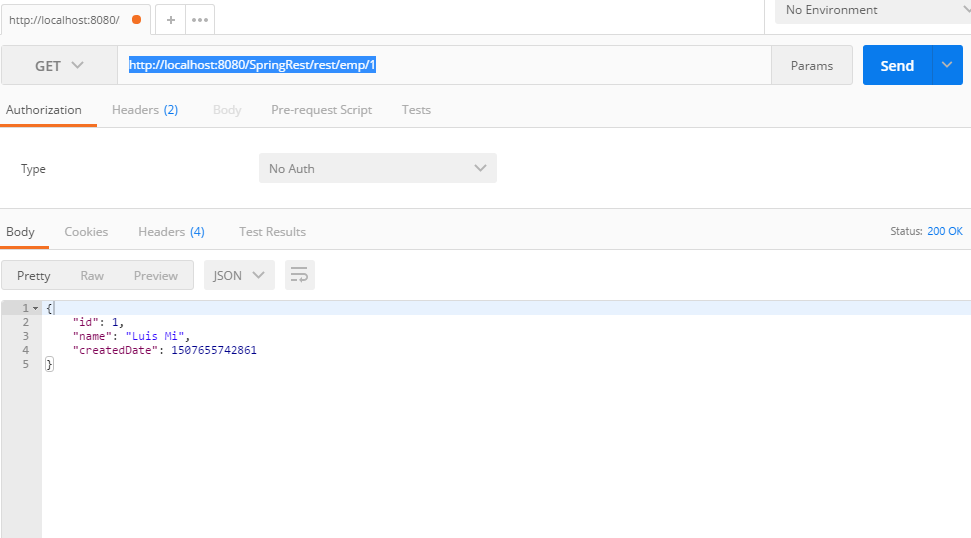
Para extraer el empleado que acabamos de generar:
http://localhost:8080/SpringRest/rest/emp/1/

Suscribirse a:
Entradas (Atom)